Scale Rust Treatment: Complete Guide to Intermediate Rust Repair
Table of Contents
Scale rust represents an intermediate stage of corrosion where the metal has begun to deteriorate but hasn't yet developed holes. This guide provides comprehensive information on treating scale rust effectively, with specific considerations for UK vehicles and climate conditions.
Understanding Scale Rust
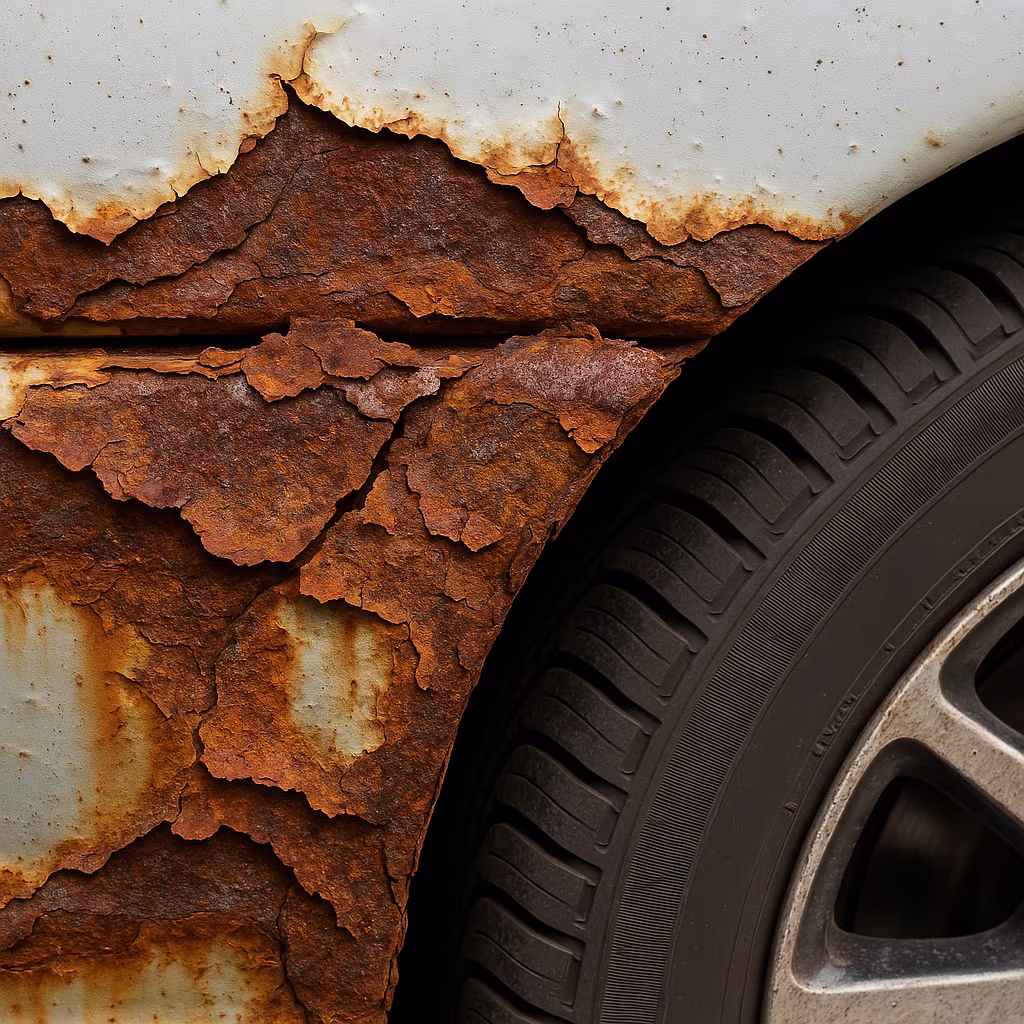
Scale rust (sometimes called laminated rust) occurs when surface rust is left untreated and corrosion penetrates deeper into the metal. At this stage, the metal begins to delaminate and flake, with the rust creating layers that expand and push outward from the original metal surface.
In the UK's damp climate, surface rust can progress to scale rust within 12-18 months if left untreated. This intermediate stage of corrosion requires more aggressive intervention than surface rust but can still be addressed without complete panel replacement in most cases.
Identifying Scale Rust
Before beginning treatment, it's important to correctly identify scale rust:
Characteristics of Scale Rust
- Appearance: Layered, flaking rust with obvious depth beyond the surface
- Texture: Rough, with pieces that can be chipped away revealing more rust beneath
- Paint symptoms: Bubbling or lifting of paint around the affected area
- Metal condition: Thinning but not yet perforated with holes
- Sound: When tapped, produces a less solid sound than surrounding metal
Differentiating from Other Rust Types
- Surface rust affects only the top layer with no significant metal loss
- Scale rust shows visible layering and metal deterioration but no complete perforation
- Penetrating rust has created holes through the metal or severe structural weakness
Common Scale Rust Locations on UK Vehicles
- Wheel arches: Especially rear arches exposed to road spray
- Door bottoms and sills: Where moisture collects and drainage can be poor
- Boot/trunk floors: Often thin metal with exposure to moisture
- Lower edges of panels: Where water runs down and collects
- Suspension mounting points: Critical areas exposed to road spray
- Chassis rails: Particularly in older vehicles
Structural Concerns
When scale rust appears on structural components like chassis rails, subframes, or suspension mounting points, it requires immediate attention. In the UK, these areas are specifically checked during MOT testing, and failure to address scale rust in these locations can result in an MOT failure.
Damage Assessment
Before beginning repairs, a thorough assessment of the damage is essential:
Initial Evaluation
- Clean the area thoroughly to reveal the full extent of the corrosion
- Probe the area gently with a screwdriver (not forcefully) to determine metal soundness
- Tap around the visibly affected area to identify the boundaries of the damage
- Check for related damage in adjacent areas or on the opposite side of panels
- Determine if the affected component is structural or cosmetic
Measuring Severity
Scale rust severity can be categorized as:
- Mild: Flaking confined to a small area, minimal metal loss
- Moderate: Wider area affected, noticeable thinning of metal
- Severe: Extensive flaking, significant metal loss, approaching penetration
DIY vs Professional Repair Decision
Based on your assessment, determine whether the repair is suitable for DIY:
- Suitable for DIY: Mild to moderate scale rust on non-structural panels
- Consider professional help: Severe scale rust, structural components, or if welding is required
- Definitely seek professional help: Any scale rust on critical safety components or when unsure of structural integrity
Tools and Preparation
Treating scale rust requires more specialized tools than surface rust repair:
Essential Tools
- Power tools: Angle grinder with wire wheel/cup, flap discs (40-80 grit)
- Air tools (optional): Needle scaler or air hammer with scaling attachment
- Hand tools: Wire brushes, chisels, scrapers, hammers
- Sandpaper: Various grits from coarse (40-80) to fine (220-400)
- Metal working tools: Body hammer and dolly for reshaping
- Measuring tools: Thickness gauge (if available)
- Cutting tools: Sheet metal snips, cutting discs
Materials Needed
- Metal repair materials: Body filler, mesh reinforcement, metal patch panels
- Chemical treatments: Rust converter, metal conditioner, rust remover
- Primers: Self-etching primer, zinc-rich primer, high-build primer
- Painting supplies: Matching paint, clear coat, thinners
- Protective coatings: Cavity wax, underseal for protected areas
- Structural adhesives: For non-welded repairs
Safety Equipment
- Respiratory protection: Dust mask for light work, proper respirator for grinding/painting
- Eye protection: Safety glasses or full face shield for grinding
- Hearing protection: Essential when using power tools
- Hand protection: Cut-resistant gloves for metal work, chemical-resistant for treatments
- Skin and clothing protection: Long sleeves, work apron
- Fire safety equipment: Fire extinguisher suitable for chemical fires
UK-Specific Products
Several products available in the UK are particularly effective for scale rust treatment: Bilt Hamber Deox-Gel for rust removal, Jenolite Rust Converter for conversion, U-POL Fiberglass Repair kits for reinforcement, and Tiger Seal adhesive sealant for panel joins. These are readily available at automotive suppliers like Halfords, Euro Car Parts, and specialist bodywork suppliers.
Scale Rust Removal Techniques
Removing scale rust requires more aggressive approaches than surface rust:
Mechanical Removal
Physical removal methods are the primary approach for scale rust:
- Wire wheel/cup on angle grinder: Most effective for large areas, removes layers of flaking rust
- Needle scaler: Excellent for breaking up thicker scale rust deposits
- Scraping and chiseling: For removing larger flakes and accessing edges
- Flap discs: For final cleaning and smoothing after bulk removal
- Sand blasting: Professional method that thoroughly cleans rust from metal
Chemical Assistance
Chemicals can help with scale rust removal:
- Rust dissolvers: Apply to break down rust before mechanical removal
- Phosphoric acid products: Convert and neutralize remaining rust after mechanical removal
- Rust converters: For treating areas where complete removal is impractical
Assessing Metal Condition After Removal
After removing scale rust, evaluate the remaining metal:
- Check metal thickness – significantly thinned areas may require reinforcement
- Look for pitting that could indicate potential future perforation
- Test the structural integrity by applying moderate pressure
- Inspect from both sides of the panel where possible
- Check surrounding areas that appeared sound for hidden damage

Scale Rust Repair Methods
Several approaches are available for repairing areas affected by scale rust:
Metal Treatment and Encapsulation
For mild scale rust with minimal metal loss:
- Process: After thorough cleaning, treat with rust converter, prime, and coat with protective paint
- Suitable for: Areas with good remaining metal thickness and non-structural components
- Limitations: Not appropriate for structural components or severely thinned metal
- Products: POR-15, Rust Bullet, Rustbuster Epoxy Mastic
Body Filler Reinforcement
For moderate scale rust with noticeable thinning:
- Process: Clean thoroughly, apply rust converter, reinforce with fiberglass mesh and body filler
- Suitable for: Non-structural panels with moderate thinning
- Limitations: Not suitable for structural components or severely weakened metal
- Products: U-POL Fibral reinforced filler, Isopon P40 fiberglass repair kit
Patch Panel Installation
For severe scale rust or areas approaching penetration:
- Process: Cut out affected area, fabricate or purchase patch panel, secure by welding or bonding
- Suitable for: Severely damaged panels where metal has significantly thinned
- Variations: Welded patches (strongest), adhesive bonded patches (easier for DIY)
- Materials: Steel patch panels, repair sections, structural adhesives
| Repair Method | Appropriate For | DIY Difficulty | UK Cost Range | Longevity | MOT Acceptability |
|---|---|---|---|---|---|
| Treatment & Encapsulation | Mild scale rust | Low-Medium | £30-70 | 2-4 years | Yes for non-structural |
| Body Filler Reinforcement | Moderate thinning | Medium | £50-120 | 3-5 years | Yes for non-structural |
| Adhesive Patch Panel | Significant thinning | Medium-High | £80-200 | 5-8 years | Acceptable on some areas |
| Welded Patch Panel | Severe damage | High (professional) | £200-500+ | Life of vehicle | Acceptable everywhere |
Step-by-Step Scale Rust Repair Guide
This procedure outlines a comprehensive approach to repairing moderate scale rust:
1. Thorough Cleaning and Preparation
- Wash the area thoroughly to remove dirt and contaminants
- Use a degreaser to remove any oils or residues
- Allow the area to dry completely
- Mask surrounding areas to protect from debris and overspray
2. Aggressive Rust Removal
- Use an angle grinder with wire wheel to remove loose and flaking rust
- Work methodically across the entire affected area
- Use hand scrapers for edges and difficult corners
- Continue until all loose scale is removed and sound metal is reached
- Clean the area with compressed air or a clean brush to remove debris
3. Chemical Treatment
- Apply a phosphoric acid-based rust remover to any remaining rust
- Allow proper dwell time according to product instructions
- Rinse thoroughly if required by product instructions
- Apply rust converter to neutralize any microscopic rust remaining
- Allow converter to fully cure (typically 24 hours)
4. Assessment and Reinforcement
- Evaluate the metal thickness and integrity after cleaning
- For significantly thinned areas, cut fiberglass mesh to size (extending beyond the damaged area)
- Mix reinforced body filler according to manufacturer instructions
- Apply a thin layer of filler, embed the fiberglass mesh, then cover with additional filler
- Build up in thin layers rather than one thick application
5. Shaping and Finishing
- Once the filler has cured, shape using progressive grits of sandpaper
- Start with 80-grit to establish basic shape
- Progress through 120, 180, 220, and 320 grits
- Use sanding blocks on flat areas for even pressure
- Check shape frequently, comparing to surrounding contours
6. Priming and Sealing
- Clean the area thoroughly with panel wipe to remove dust and oils
- Apply etching primer to any bare metal areas
- Follow with high-build primer over the entire repair
- Apply in multiple thin coats rather than one heavy coat
- Allow appropriate curing time between coats
7. Color Coating and Protection
- Wet sand the primed area with 400-600 grit sandpaper for a smooth finish
- Clean thoroughly and mask as needed
- Apply color-matched paint in thin, even coats
- Allow appropriate flash-off time between coats
- Apply clear coat if using a two-stage paint system
- Allow full curing time according to paint manufacturer specifications
8. Preventative Measures
- For hidden areas, apply cavity wax after paint has fully cured
- For underside repairs, apply underbody sealant for additional protection
- Consider additional preventative treatments for adjacent areas
- Document the repair for future reference
Working with Body Fillers in UK Conditions
The UK's damp climate affects body filler curing. Work in temperatures above 15°C when possible, and consider using a dehumidifier in your workspace. Moisture contamination is the most common cause of filler failure, so ensure the repair area is completely dry before application. In winter, warm the surface slightly before applying filler to improve adhesion and curing.
MOT Considerations for Scale Rust Repairs
The UK's MOT testing system has specific requirements regarding rust repairs:
UK MOT Rust Standards
- Corrosion within 30cm of a prescribed area must not cause weakness
- Structural components must be free of serious corrosion
- Body filler alone is not acceptable for structural repairs
- Repair plates must be securely attached and properly protected
- Excessive or inadequate welding can result in MOT failure
Critical MOT Inspection Areas
These areas receive particular scrutiny during MOT testing:
- Suspension mounting points: Including shock absorber and spring mounts
- Subframe mounting points: Where subframes attach to the main structure
- Chassis rails and structural members: Primary vehicle structure
- Seatbelt mounting areas: Must be completely sound
- Brake, fuel, and steering components: Mounting points and surrounding structures
- Jacking points: Must be capable of supporting the vehicle safely
Acceptable Repair Methods for MOT
- Welded repairs: Preferred method for structural components
- Riveted plates with adhesive: Acceptable for some structural repairs if properly executed
- Body filler reinforced with mesh: Acceptable only for non-structural panels
- Encapsulation: Acceptable only for non-structural components with minimal damage
For detailed information on MOT standards, consult the UK Government MOT Inspection Manual.
Conclusion
Scale rust represents a significant but manageable challenge for vehicle owners in the UK. While more involved than surface rust treatment, proper repairs can restore both structural integrity and appearance without necessarily requiring professional intervention for non-critical areas.
The key to successful scale rust repair is thoroughness - proper assessment, complete rust removal, appropriate reinforcement, and comprehensive protection will ensure lasting results. In the UK's damp climate, taking the extra time to properly seal and protect repaired areas is particularly important.
When in doubt about structural components or safety-critical areas, always consult with a professional. The cost of professional repair is insignificant compared to the potential safety implications of inadequate repairs to these areas.
For more advanced rust issues, refer to our guide on penetrating rust treatment, or for simpler surface rust issues, see our surface rust guide.
References and Further Reading
- Driver and Vehicle Standards Agency, "MOT Inspection Manual: Cars and Passenger Vehicles", 2024 Edition
- Institute of the Motor Industry, "Vehicle Body Repair Standards", Technical Publication 2023
- Society of Automotive Engineers, "Corrosion Repair Standards for Automotive Structures", Technical Paper 2023-01-0732
- British Coatings Federation, "Protective Coatings for Automotive Repair", Industry Guidelines 2024
- Health and Safety Executive, "Safe Working Practices in Vehicle Repair", HSE Guidance Note GS38, 2023