Penetrating Rust Treatment: Complete Guide to Advanced Rust Repair
Table of Contents
Penetrating rust represents the most advanced stage of corrosion, where metal has been compromised to the point of creating holes or serious structural weakness. This comprehensive guide covers assessment, repair options, and considerations specific to UK vehicles facing severe rust damage.
Understanding Penetrating Rust
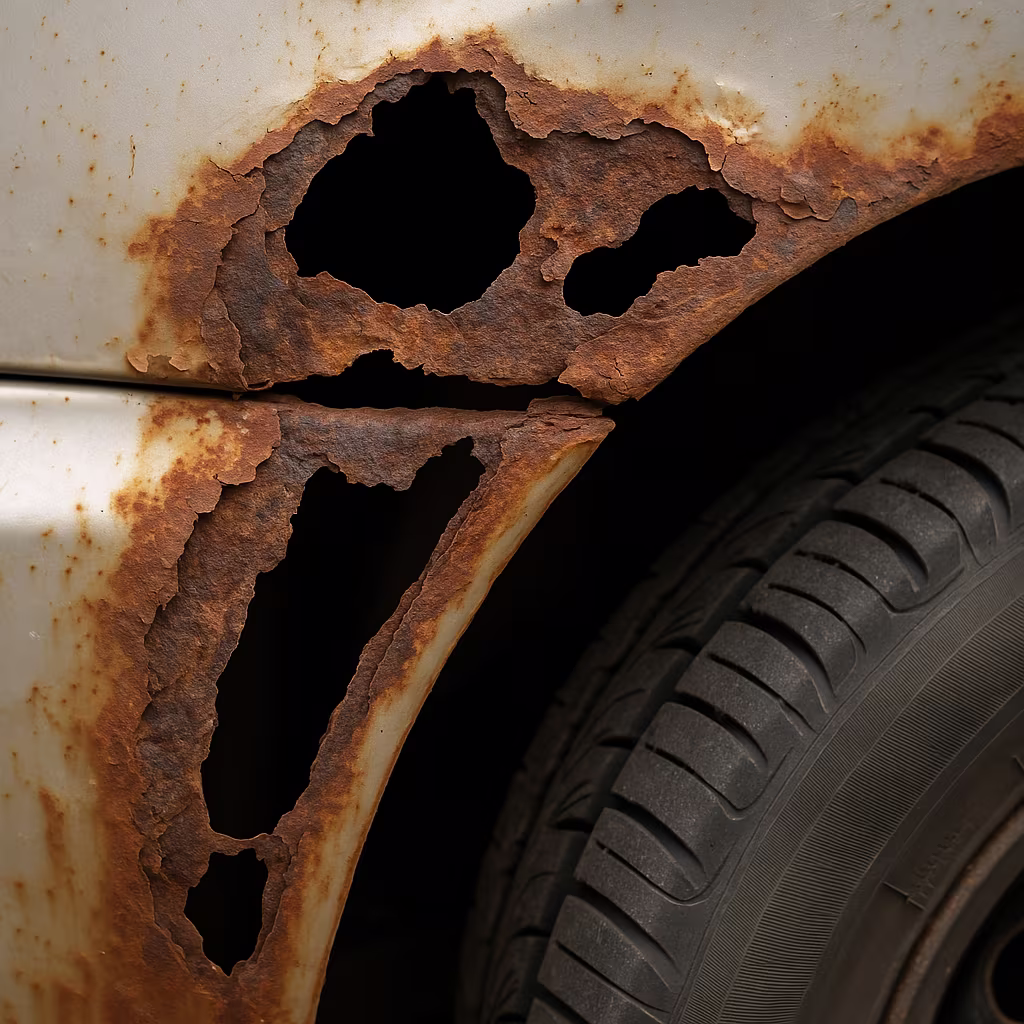
Penetrating rust occurs when corrosion has progressed through the entire thickness of metal, creating holes or severely compromising structural integrity. This advanced stage of rust damage presents significant challenges for repair and often raises serious safety concerns, particularly for structural components.
In the UK's damp climate with its frequent exposure to road salt, penetrating rust is a common problem, especially in vehicles over 8-10 years old or those that have spent significant time in coastal areas. While challenging, appropriate treatment options do exist depending on the location and extent of the damage.
Identifying Penetrating Rust
Correctly identifying penetrating rust is crucial for determining appropriate treatment:
Characteristics of Penetrating Rust
- Visible perforation: Holes completely through the metal
- Structural weakness: Metal that gives way under light pressure
- Bubbled expansion: Significant bubbling of metal and paint
- Extensive flaking: Large areas where metal has corroded away
- Hollow sound: When tapped, produces a distinctly hollow sound compared to solid metal
- Disintegration: Metal that crumbles or breaks when probed
High-Risk Areas for UK Vehicles
On British vehicles, penetrating rust commonly appears in these locations:
- Sills and door bottoms: Particularly vulnerable due to water collection and poor drainage
- Wheel arches: Especially rear arches exposed to road spray and debris
- Floor pans: Often thin metal exposed to water from above and below
- Suspension mounting points: Critical structural areas subject to stress and exposure
- Chassis rails: Particularly on older vehicles and commercial vehicles
- Boot/trunk floors: Often collect moisture from leaking seals
- Jacking points: Subject to stress and often trap moisture
Danger Signs Requiring Immediate Attention
Penetrating rust in these areas represents an immediate safety concern requiring professional assessment: brake component mounting points, fuel tank and fuel line areas, steering components and mounts, suspension mounting points, and structural load-bearing chassis components. In the UK, vehicles with such damage will fail MOT testing.
Safety Implications of Penetrating Rust
Penetrating rust carries significant safety implications that must be taken seriously:
Structural Integrity Compromise
When penetrating rust affects structural components, it can:
- Reduce the vehicle's ability to absorb impact energy in a collision
- Create failure points that can collapse under normal driving stresses
- Compromise designed crumple zones, potentially increasing injury risk
- Affect alignment of suspension and drivetrain components
- Create unpredictable behavior during emergency maneuvers
System Failures
Beyond structural concerns, penetrating rust can lead to critical system failures:
- Brake component mounting: Potential brake failure if mounting points fail
- Fuel system integrity: Rust near fuel components can create fire hazards
- Steering component mounts: Can lead to sudden loss of control
- Suspension failure: Compromised mounting points can fail catastrophically
- Exhaust system detachment: Creates hazards on the road and potential for toxic gas entry
UK MOT Implications
The UK's MOT testing system specifically targets rust damage:
- Penetrating rust within 30cm of any "prescribed area" (structural component) is an automatic failure
- Any perforation in a structural component results in MOT failure
- Repaired areas must meet specific standards to pass inspection
- Inspectors may issue "dangerous" categorization preventing legal road use until repaired
- Corrosion that affects steering, suspension, braking or structural integrity will fail MOT
Repair vs. Replacement Decision
When facing penetrating rust, a critical decision must be made between repair and replacement:
Factors Influencing the Decision
- Vehicle value: Restoration may not be economically viable for lower-value vehicles
- Component criticality: Structural components typically require complete replacement
- Extent of damage: Large areas of penetrating rust usually warrant replacement
- Rust spread: Consider whether rust has affected surrounding areas
- Repair access: Some areas are prohibitively difficult to access for repair
- Parts availability: Replacement parts may be limited for older or rare vehicles
- Budget constraints: Professional repairs can be costly
When Repair May Be Viable
Repair might be appropriate when:
- Penetrating rust is limited to a small, well-defined area
- The affected component is non-structural or cosmetic
- The vehicle has historic or sentimental value justifying restoration
- Replacement parts are unavailable or prohibitively expensive
- The surrounding metal is in good condition
When Replacement Is Necessary
Component or panel replacement is necessary when:
- Rust affects critical structural components
- The damaged area is extensive (covering more than 25% of a panel)
- Multiple perforations exist across a component
- The cost of proper repair exceeds replacement cost
- Safety certification (MOT) would be compromised by repair
| Vehicle Component | Repair Viability | Replacement Complexity | UK Cost Range (Professional) | DIY Possibility |
|---|---|---|---|---|
| Door Skin/Outer Panel | Often viable | Medium | £400-800 | Possible for experienced DIY |
| Wing/Fender | Often viable | Low-Medium | £350-650 | Good DIY project |
| Sill/Rocker Panel | Challenging | High | £600-1,200 per side | Advanced DIY only |
| Floor Pan | Viable in sections | Medium-High | £500-1,200 | Advanced DIY possible |
| Chassis Rail | Rarely viable | Very High | £800-2,000+ | Professional only |
| Suspension Mount | Not recommended | Very High | £700-1,500 | Professional only |
Professional Repair Methods
Professional approaches to penetrating rust repair include:
Complete Panel Replacement
The most comprehensive solution:
- Process: Removal of entire affected panel and installation of new panel
- Advantages: Factory-like finish, complete restoration of strength, long-term solution
- Best for: Extensive damage, structural components, valuable vehicles
- Considerations: Highest cost, may require specialized tooling and skills
Section Replacement
Replacing only the damaged portion:
- Process: Cutting out affected section, welding in repair panel
- Advantages: More economical than full panel, can maintain original components where possible
- Best for: Well-defined damage areas, partial panel damage
- Considerations: Requires precision cutting and welding, potential for future issues at seams
Fabricated Repairs
Custom-made repair sections:
- Process: Creating custom metal patches precisely fitted to the damaged area
- Advantages: Can address unique or unusual damage, useful for rare vehicles without available parts
- Best for: Rare vehicles, complex shapes, historic preservation
- Considerations: Requires highly skilled technicians, time-intensive, typically more expensive
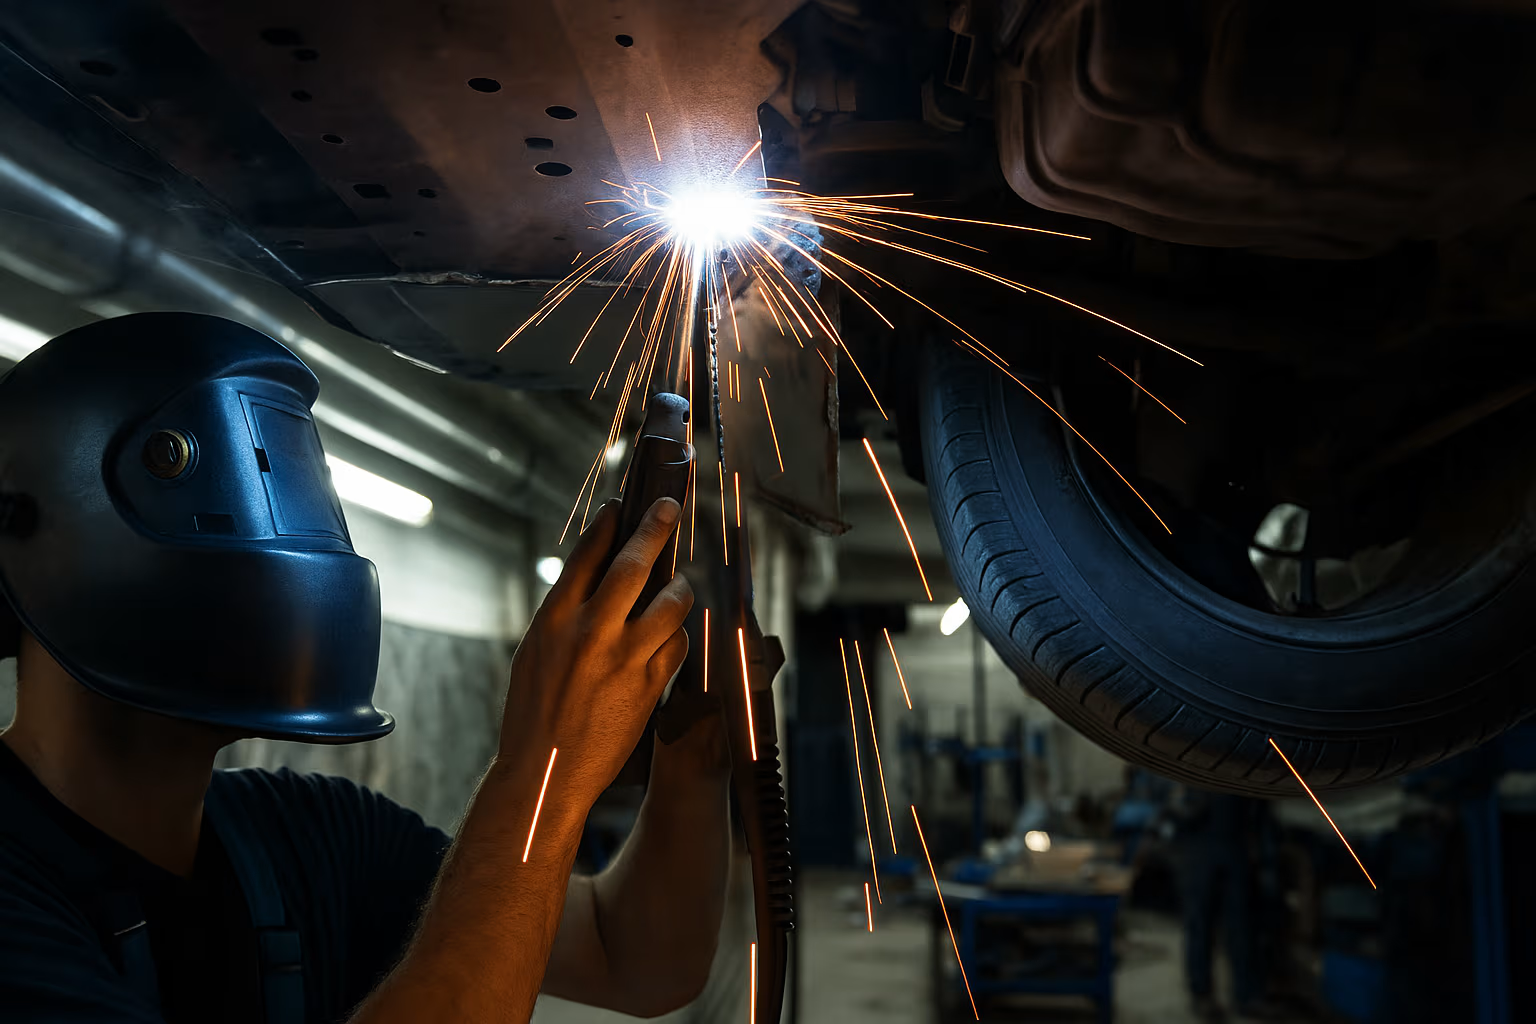
Professional Welding Techniques
Critical to quality repairs:
- Butt welding: Edge-to-edge joining for seamless repairs
- Lap welding: Overlapping metal for additional strength
- Plug welding: Creating secured attachments through pre-drilled holes
- Stitch welding: Series of short welds to control heat distortion
- MIG vs TIG: Different welding processes for specific applications
Professional Sealing and Protection
Essential for preventing recurrence:
- Seam sealer: Applied to all joints to prevent moisture ingress
- Cavity wax: Injected into enclosed sections after repair
- Factory-equivalent e-coating: Provides corrosion resistance comparable to original
- Zinc-rich primers: Provide sacrificial galvanic protection
- Multi-stage paint systems: Ensure proper protection and finish matching
Finding Quality Rust Repair Specialists in the UK
When seeking professional help, look for specialists with proven rust repair experience. The UK has several notable rust repair specialists including restoration shops certified by marque-specific organizations, members of the Vehicle Builders and Repairers Association (VBRA), and specialists endorsed by classic car clubs. Request to see examples of previous rust repair work, particularly work that has stood the test of time.
DIY Options for Non-Structural Areas
While structural penetrating rust should be professionally addressed, some non-structural repairs may be suitable for DIY:
Patch Panel Installation
For moderate DIY skill levels:
- Process: Cut out rusted area, prepare replacement patch, secure with welding or adhesive
- Tools needed: Angle grinder with cutting discs, drill, rivet gun, spot-weld drill bits
- Materials: Pre-made patch panels or sheet metal, panel adhesive, rivets, body filler
- Suitable for: Non-structural panels like boot floors, lower door sections, wing/fender edges
Adhesive Bonded Repairs
For those without welding equipment:
- Process: Remove rust, clean thoroughly, bond patch with structural adhesive, reinforce with rivets
- Products: Panel-bonding adhesives (3M, Tiger Seal, U-POL), self-drilling screws or rivets
- Suitable for: Non-structural cosmetic panels, lower stress areas
- Limitations: Not acceptable for structural components or MOT-critical areas
Fiberglass Reinforced Repairs
For small, non-structural holes:
- Process: Clean area, create backing support, apply fiberglass matting with resin
- Products: U-POL or Isopon fiberglass repair kits, mesh reinforcement
- Suitable for: Small penetrations in non-structural, non-flexing panels
- Limitations: Temporary solution, not structurally sound, may fail MOT on critical areas
DIY Considerations for UK Climate
Important factors when performing DIY rust repairs in British conditions:
- Temperature and humidity significantly affect adhesive curing and paint drying
- Work should ideally be performed in conditions between 15-25°C with humidity below 70%
- Allow extra curing time in damp conditions
- Consider using a dehumidifier in your workspace during wet months
- Apply additional corrosion protection to account for the UK's harsh winter conditions
- Extend cavity wax application beyond the repair area to prevent adjacent rust formation
DIY Safety Warning
Never attempt DIY repairs on safety-critical components including chassis rails, suspension mounting points, steering components, brake system mounts, or fuel system components. Improper repairs to these areas can lead to catastrophic failure, potential injury, and definite MOT failure. These areas must be professionally repaired using proper techniques and materials.
Cost Analysis of Penetrating Rust Repair
Understanding the financial implications helps in making informed decisions:
Professional Repair Costs in the UK
Typical repair costs from UK body shops and specialists:
- Small patch panel welding: £300-600
- Complete sill replacement: £600-1,200 per side
- Floor pan section: £500-1,000
- Wing/fender replacement: £350-700
- Chassis rail repair: £800-2,000+
- Complete floor replacement: £1,500-3,000
- Major structural restoration: £3,000-10,000+
Note: Prices vary significantly by region (London and Southeast typically 20-30% higher), vehicle make/model, and shop specialization.
DIY Cost Considerations
Typical expenses for DIY penetrating rust repair:
- Pre-made patch panels: £40-200 depending on size and vehicle
- Sheet metal: £20-50 for DIY fabrication
- Structural adhesives: £15-30 per cartridge
- Cutting/grinding tools: £50-200 (one-time investment)
- Welding equipment: £200-500+ (one-time investment)
- Paint and finishing: £100-200 for quality products
- Protective coatings: £30-80 for cavity wax and undercoating
Value Considerations
Factors affecting the cost-benefit calculation:
- Vehicle value appreciation/depreciation: Classics may justify higher investment
- Intended ownership period: Longer planned ownership improves repair ROI
- Safety implications: Never compromise on safety-critical repairs regardless of cost
- Alternative vehicle costs: Compare repair costs to replacement vehicle expenses
- Sentimental value: Non-financial considerations may justify higher expenditure
Preventing Spread to Other Areas
When dealing with penetrating rust, preventing its spread to adjacent areas is crucial:
Adjacent Area Protection
- Inspect and treat early-stage rust in surrounding areas
- Apply rust converter to questionable areas before they deteriorate
- Ensure all drain holes are clear and functioning properly
- Address any adjacent paint damage that could allow moisture penetration
- Apply preventative treatments to similar locations on the opposite side of the vehicle
Extended Protection Strategies
- Cavity wax injection: Apply to all enclosed sections near the repair
- Underbody coating: Refresh or apply protective coating to underside areas
- Seam sealer: Apply to all panel joins and seams in the vicinity
- Sacrificial anodes: Consider for classic vehicles stored long-term
- Environmental controls: Address storage conditions to minimize moisture exposure
Long-Term Monitoring
- Perform regular inspections of repaired areas and surrounding components
- Take dated photographs for comparison to track any changes over time
- Check hidden areas with a borescope camera periodically
- Address any new paint damage or chips immediately
- Consider professional inspections annually for high-value vehicles
Conclusion
Penetrating rust represents the most serious form of corrosion damage and requires prompt, comprehensive attention. While challenging, appropriate repair strategies exist for most situations, though some require professional intervention.
The key considerations when facing penetrating rust are:
- Safety first: Never compromise on structural or safety-critical components
- Honest assessment: Realistically evaluate the extent of damage and repair viability
- Appropriate techniques: Match the repair approach to the specific situation
- Comprehensive protection: Ensure repairs include proper sealing and rust prevention
- Future prevention: Implement strategies to prevent recurrence
For UK vehicle owners, the damp climate and road salt use make rust prevention particularly important. Following proper repair of penetrating rust, implementing a comprehensive rust prevention program is essential to maintain your vehicle's integrity and value.
For less severe corrosion issues, refer to our guides on surface rust and scale rust treatment, where simpler and more cost-effective approaches may be appropriate.
References and Further Reading
- Driver and Vehicle Standards Agency, "MOT Inspection Manual: Section 6 - Body, Structure", 2024 Edition
- Institute of the Motor Industry, "Structural Body Repair Standards", Technical Publication 2023
- Society of Automotive Engineers, "Structural Repair Guidelines for Automotive Bodies", Technical Paper 2024-01-0831
- Federation of British Historic Vehicle Clubs, "Rust Repair Standards for Historic Vehicles", Best Practice Guide, 2023
- Health and Safety Executive, "Safe Working with Automotive Repairs", HSE Guidance Note GS47, 2025