Surface Preparation Guide: Essential Steps for Effective Rust Treatment
Table of Contents
Proper surface preparation is the foundation of any successful rust treatment or prevention strategy. This comprehensive guide explores the essential steps, techniques, and products needed to correctly prepare metal surfaces before applying rust treatments, primers, or paints.
Introduction to Surface Preparation
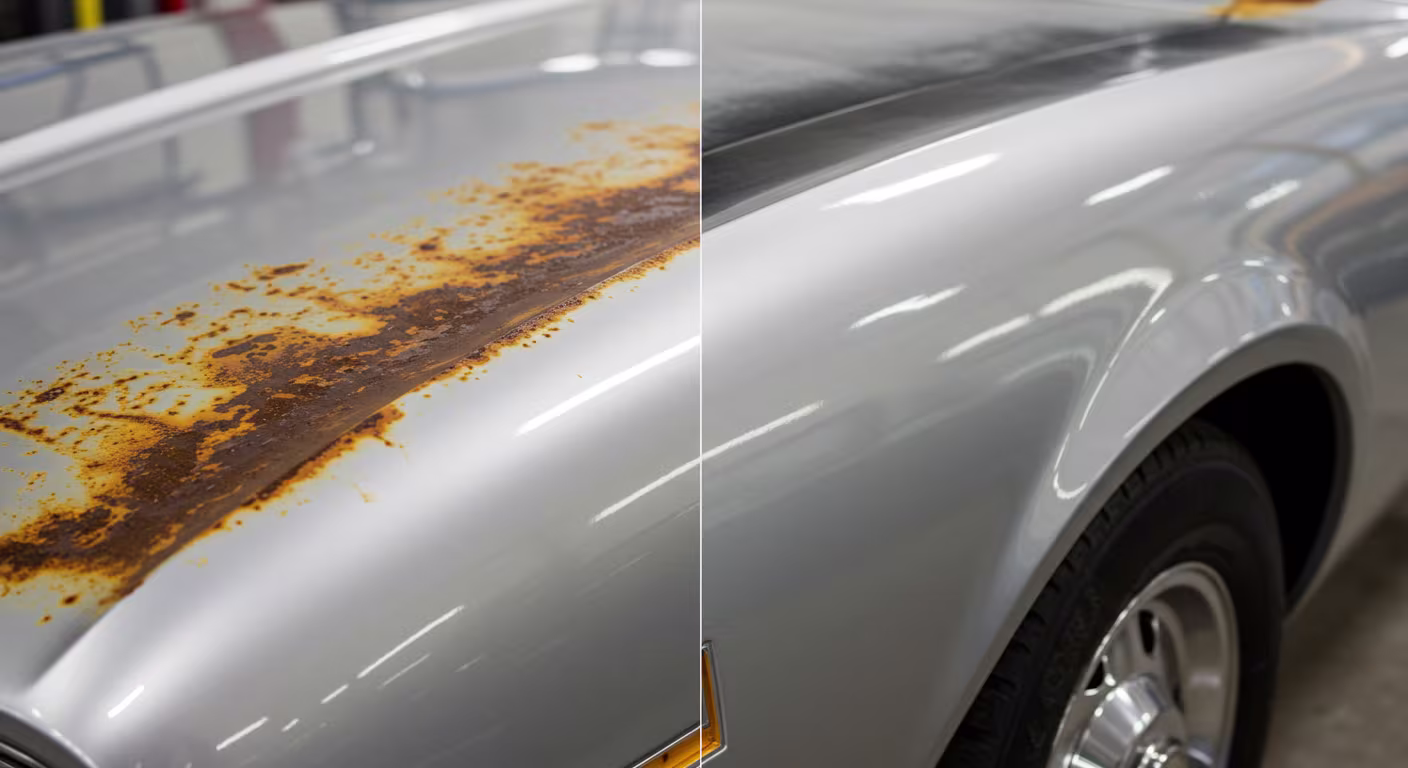
Surface preparation is arguably the most critical step in the rust treatment process, yet it's often rushed or improperly executed. The quality of your preparation work directly determines how effective your rust treatment will be and how long it will last. Professional restorers often say that successful rust treatment is 90% preparation and 10% application.
This guide focuses specifically on the proper techniques for preparing metal surfaces for rust treatment in the UK climate, where high humidity and frequent rain create particularly challenging conditions for vehicle metal preservation. We'll cover both mechanical and chemical preparation methods, with special attention to the specific requirements of different types of automotive surfaces.
Why Proper Surface Preparation Matters
Understanding why meticulous surface preparation is essential helps emphasize its importance in the overall rust treatment process. The benefits of proper preparation go far beyond just having a clean surface — they fundamentally affect the chemistry and physics of how treatments bond with metal.
Key Benefits of Proper Preparation
- Enhanced adhesion - Properly prepared surfaces allow treatments to form stronger chemical and mechanical bonds
- Improved penetration - Treatments can better reach into the microscopic structure of the metal
- Removal of contaminants - Eliminates substances that might interfere with chemical reactions or cause future corrosion
- Extended treatment life - Significantly increases the longevity of rust prevention or treatment
- Prevention of flash rusting - Reduces the risk of new rust forming between preparation and treatment
- Cost efficiency - Reduces wasted product and the need for premature reapplication
The Science Behind Surface Preparation
At a microscopic level, metal surfaces are not smooth but contain countless tiny peaks and valleys. Proper preparation not only removes contaminants but creates an optimal surface profile that increases the actual contact area between treatment and metal by up to 40%. This expanded surface area dramatically improves adhesion through both mechanical and chemical bonding.
Surface Assessment and Planning
Before beginning any preparation work, a thorough assessment of the current surface condition is essential. This evaluation helps determine the appropriate preparation strategy and identifies any special considerations that might be needed.
Evaluating Surface Condition
- Extent of existing rust - Surface rust, scale rust, or penetrating rust require different approaches
- Previous treatments - Identify any coatings, paints, or treatments that may need removal
- Contaminants present - Oil, grease, road salt, mud, or wax require specific cleaning methods
- Metal type - Steel, aluminium, galvanized surfaces, or mixed metals need tailored preparation
- Environmental exposure - Areas exposed to road salt or coastal environments need special attention
- Structural considerations - Assess if the rust has compromised structural integrity
Planning Your Approach
Based on your assessment, develop a systematic preparation plan that might include:
- Initial cleaning to remove loose debris and surface contaminants
- Degreasing to remove oils and waxes
- Mechanical rust removal (sanding, wire brushing, media blasting, etc.)
- Chemical rust removal or conversion
- Neutralization of any chemical treatments
- Final cleaning and surface preparation
- Application of anti-flash rust protection if there will be a delay before treatment
Safety First
Surface preparation often involves hazardous chemicals and can create harmful dust. Always wear appropriate PPE including eye protection, chemical-resistant gloves, respiratory protection, and skin coverage. Work in well-ventilated areas and follow all manufacturer safety guidance for chemicals used.
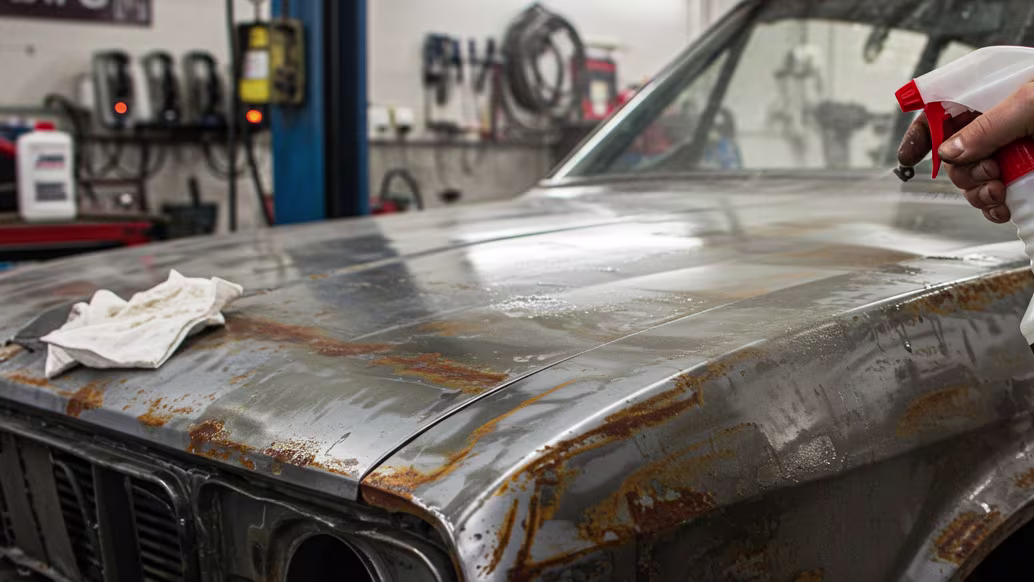
Cleaning and Degreasing
Before any mechanical or chemical rust treatment can be effective, all surfaces must be thoroughly cleaned and degreased. This critical step removes contaminants that would otherwise prevent treatments from properly bonding with the metal surface.
Initial Cleaning
Begin with a thorough cleaning to remove loose debris, dirt, and visible contaminants:
- Pressure washing - Effective for removing accumulated dirt, especially in undercarriage areas
- Salt removal - Products like Rustbuster Chlor-X specifically target and neutralize road salt
- Manual cleaning - Use brushes to remove loose rust scale and debris from hard-to-reach areas
- Allow to dry - Ensure surfaces are completely dry before proceeding to degreasing
Degreasing Options
Degreasing is essential as even microscopic oil films can prevent proper adhesion:
- Water-based degreasers - Products like POR-15 Marine Clean or Rustbuster Safer Degreaser offer effective, environmentally friendly options
- Solvent-based degreasers - Products like POR-15 Cleaner Degreaser provide powerful degreasing for heavily contaminated surfaces
- Wax and silicone removers - Essential for surfaces that may have been previously polished or treated with protective products
- Industrial degreasers - Products like Rustbuster SP10 Tank-Kleen for heavy-duty applications
Degreasing Application Techniques
For optimal results when degreasing:
- Apply degreaser as per manufacturer instructions (spray, brush, or immersion)
- Allow proper dwell time for the degreaser to emulsify oils (typically 5-15 minutes)
- Agitate heavily contaminated areas with a brush
- Rinse thoroughly with clean water (unless using a non-rinse formula)
- For critical applications, perform a water break test - water should sheet evenly without beading
- Allow to dry completely before proceeding
Water Break Test
A simple way to verify your degreasing was effective is the water break test. Spray clean water onto the surface - if it forms a continuous sheet, degreasing was successful. If the water beads or forms droplets, oils remain present and further degreasing is needed.
Rust Removal Techniques
Once the surface is clean and degreased, the next step is removing existing rust through mechanical or chemical means, or often a combination of both. The choice of method depends on the severity and extent of rust, accessibility, and the tools available.
Mechanical Rust Removal
Mechanical methods physically remove rust from the surface:
- Sanding - Effective for accessible flat surfaces
- Coarse grits (40-80) for heavy rust
- Medium grits (100-220) for light rust
- Fine grits (320+) for final preparation
- Wire brushing - Good for reaching contours and crevices
- Power drill attachments for efficiency
- Hand brushes for detail work
- Stainless steel brushes to avoid contamination
- Abrasive blasting - Most thorough method for severe rust
- Sand blasting for heavy-duty removal (See our Rust Tools Guide)
- Soda blasting for gentler approach
- Walnut shell or plastic media for delicate surfaces (Requires a High CFM Compressor)
- Needle scalers - Excellent for thick rust scale
- Grinding - Fast removal but requires skill to avoid damaging metal
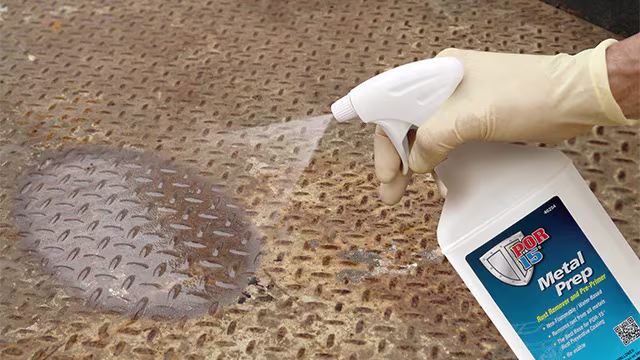
Chemical Rust Removal
Chemical methods dissolve rust through acid-based reactions:
- Phosphoric acid-based removers - Products like POR-15 Metal Prep or Rustbuster Phos-Kleen
- Dissolve rust while leaving a protective phosphate coating
- Provide excellent preparation for painting
- Work well for light to moderate rust
- Oxalic acid-based removers - Gentler option for delicate surfaces
- Hydrochloric acid products - Most aggressive option for severe rust
- Gel formulations - Ideal for vertical surfaces to prevent runoff
Chemical Safety
Chemical rust removers can be hazardous. Always wear chemical-resistant gloves, eye protection, and work in well-ventilated areas. Follow neutralization steps carefully, as residual acid can continue to react and damage metal or compromise future treatments.
Choosing the Right Approach
For most effective results, combine approaches based on the specific situation:
- Start with mechanical removal for heavy rust
- Follow with chemical treatment to remove microscopic rust in pits and pores
- For inaccessible areas (like box sections), rely primarily on chemical methods
- For light surface rust, chemical removal alone may be sufficient
- For show-quality restorations, complete mechanical removal to bare metal is ideal
- For structural components, be thorough—inadequate preparation can compromise safety
Chemical Preparation
Beyond rust removal, chemical preparation creates an optimal surface for treatments and can provide temporary protection during the preparation process. This step is particularly important in the UK's damp climate, where flash rusting can occur rapidly after cleaning.
Metal Etch Primers
These products chemically etch the metal surface to:
- Create microscopic "teeth" that improve adhesion
- Provide an initial protective layer
- Neutralize any remaining rust particles
- Examples include POR-15 Metal Prep and Frost Metal Prep
Phosphating Treatments
Phosphating creates a chemical conversion coating that:
- Transforms the metal surface into iron phosphate
- Dramatically improves paint adhesion
- Prevents flash rusting between preparation and painting
- Provides a degree of corrosion protection
- Products include Rustbuster Phos-Kleen A and B
Mordant Solutions (for Galvanized Surfaces)
These special treatments are essential for galvanized surfaces:
- Prepares zinc-coated surfaces for painting
- Creates chemical "teeth" on otherwise smooth galvanized surfaces
- Prevents paint delamination from galvanized metal
- T-Wash (Rustbuster Galvanised Metal Primer T-Wash) is commonly used
Anti-Flash Rust Treatments
In the UK climate, flash rusting can occur within hours. These products:
- Provide temporary protection between preparation and painting
- Create a neutral surface pH to prevent oxidation
- Examples include Rustbuster BOR-8 Anti-Flash
Application Techniques for Chemical Preparation
For optimal results with chemical preparation:
- Ensure surface is completely clean, degreased, and dry
- Apply chemical prep as per manufacturer instructions (usually spray or brush)
- Maintain a wet surface for the recommended dwell time (typically 15-30 minutes)
- For vertical surfaces, make multiple lighter applications to prevent runs
- For some products, light scrubbing during application improves results
- Rinse thoroughly if required by product instructions
- Allow to dry completely before proceeding
Technical Insight: Phosphating
Phosphating creates a crystalline layer of metal phosphate that becomes part of the surface. This layer typically measures 3-5 microns thick and contains microscopic irregular crystals that dramatically increase the surface area for paint adhesion while providing a barrier that slows the electrochemical process of corrosion.
Surface Profile Preparation
Creating the correct surface profile is essential for both the adhesion and performance of rust treatments, primers, and paints. The term "profile" refers to the microscopic texture of the surface, which should be optimized for the specific coating system you plan to use.
Importance of Surface Profile
The right profile ensures:
- Maximum surface area for chemical and mechanical bonding
- Proper coating thickness and coverage
- Reduced risk of delamination or failure
- Optimal performance of specialized rust treatments
Creating the Ideal Profile
Different coating systems require different profiles:
- For standard automotive paints - 180-220 grit finish is typically ideal
- For epoxy coatings - 80-120 grit creates better adhesion for these thicker coatings
- For rust converters - Follow with fine wire brushing (not sanding) for best results
- For direct-to-rust coatings - Verify manufacturer specifications, as requirements vary
Final Preparation Steps
Before applying your chosen treatment:
- Remove all dust with a tack cloth or air compressor
- Use a final wipe with appropriate panel prep (like Frost Panel Cleaner)
- Verify the surface is completely dry
- Check for proper profile using raking light to inspect the surface
- Ensure the environment is appropriate for application (temperature and humidity)
- Proceed with application without delay to prevent flash rusting
Recommended UK Products
The UK market offers several excellent options for surface preparation, each with specific strengths. Here are some of the most effective products available:
Cleaners and Degreasers
- POR-15 Cleaner Degreaser - Excellent for heavy oils and greases
- Rustbuster Safer Degreaser - Environmentally friendly option for general degreasing
- Rustbuster SP10 Tank-Kleen - Industrial-strength for heavy contamination
- Frost Panel Cleaner (C110) - Ideal pre-painting prep in aerosol form
Salt Removers
- Rustbuster Chlor-X - Specifically targets and neutralizes road salt deposits
Rust Removers and Metal Prep
- POR-15 Metal Prep - Excellent phosphoric acid-based prep that removes rust and creates a zinc phosphate coating
- Rustbuster Phos-Kleen A - 2024 new formula for efficient rust removal
- Rustbuster Phos-Kleen B - Stronger formula for heavy rust
- Frost Metal Prep (S205/S206) - High-quality phosphoric acid prep in various sizes
Special Surface Treatments
- Rustbuster T-Wash - Essential mordant solution for galvanized surfaces
- Rustbuster BOR-8 Anti-Flash - Prevents flash rusting between preparation and treatment
- Eastwood PRE Painting Prep - Excellent final cleaner before painting
| Product | Primary Function | Best For | Application Method | Dwell Time |
|---|---|---|---|---|
| POR-15 Metal Prep | Rust removal & phosphating | General preparation | Spray or brush | 15-30 minutes |
| Rustbuster Phos-Kleen A | Rust removal & phosphating | Light to medium rust | Spray or brush | 15-30 minutes |
| Rustbuster Safer Degreaser | Degreasing | General cleaning | Spray | 5-10 minutes |
| Frost Panel Cleaner | Final cleaning | Pre-paint prep | Spray | 0-5 minutes |
| Rustbuster BOR-8 | Flash rust prevention | Between prep stages | Spray or brush | No rinse required |
Common Mistakes to Avoid
Even experienced restorers can make errors during surface preparation. Being aware of these common mistakes helps avoid treatment failures:
Preparation Shortcuts
- Inadequate degreasing - Microscopic oil films will prevent proper adhesion
- Rushing between steps - Not allowing proper dwell time for chemicals to work
- Incomplete rust removal - Missing rust in crevices will spread under the coating
- Improper neutralization - Residual chemicals can compromise treatments
- Using contaminated tools - Brushes or cloths with oil or silicone residue
- Poor rinsing - Chemical residues left on surfaces
Environmental Errors
- Working in high humidity - Can cause flash rusting between steps
- Incorrect temperature - Many chemicals need minimum temperatures to work effectively
- Dust contamination - Preparing surfaces in dusty environments
- Fingerprint contamination - Touching prepared surfaces without gloves
- Excessive delays - Waiting too long between preparation and coating
The High Cost of Poor Preparation
Inadequate surface preparation is the leading cause of coating failure in automotive applications. The cost of doing the job twice (including labor and materials) far exceeds the time investment for proper preparation. Many rust treatment warranties are void if proper surface preparation guidelines aren't followed.
Conclusion
Proper surface preparation is the foundation upon which all successful rust treatment and prevention rests. The time and attention invested in thorough preparation pays dividends in treatment effectiveness, longevity, and overall quality of results.
For UK vehicle owners facing the challenges of our damp climate and salt-treated roads, meticulous preparation is even more critical. By following the guidance in this article and selecting appropriate products for your specific needs, you'll create optimal conditions for whatever rust treatment or prevention system you choose to apply.
Remember that while preparation may not be the most exciting part of a restoration or rust treatment project, it is undoubtedly the most important. Take your time, follow proper procedures, and you'll be rewarded with superior results that stand the test of time.