DIY Rust Repair Guides: Professional Techniques for Home Mechanics
Table of Contents
With the right techniques, tools, and products, many rust repair tasks can be successfully accomplished by DIY enthusiasts. This comprehensive guide provides step-by-step instructions for tackling different rust issues on your vehicle, helping you save money while achieving professional-quality results.
Introduction to DIY Rust Repair
Taking on rust repair yourself can be both rewarding and cost-effective, particularly in the UK where professional body shop rates continue to climb. While severe structural rust should be left to professionals, many common rust issues can be tackled by enthusiastic DIYers with the right guidance. The satisfaction of restoring your vehicle with your own hands adds a personal connection to the process that goes beyond the financial savings.
The key to successful DIY rust repair lies in understanding what you're dealing with, proper preparation, selecting the right products, and following methodical procedures. Rushing any step typically leads to disappointing results and wasted effort. Throughout this guide, we'll emphasize techniques that have proven successful in the challenging UK climate, where vehicles face unique corrosion challenges from coastal salt air, winter road treatments, and persistent dampness.
We'll also reference specific products available in the UK market that have demonstrated exceptional performance, including brands like POR-15, Dinitrol, and Bilt Hamber, which have established strong reputations among British restoration enthusiasts and professional mechanics alike.
Preparation and Safety Considerations
Before diving into any rust repair project, thorough preparation and attention to safety are essential. Working with rust removal products, paints, and power tools presents various hazards that can be mitigated with proper precautions. The chemicals used in rust conversion and removal can cause skin irritation or respiratory issues if mishandled, while mechanical removal methods generate dust that can contain harmful metal particles. Taking the time to set up properly will not only protect your health but also contribute to a more successful repair outcome.
Workshop Setup
Creating an appropriate workspace is the first step toward successful DIY rust repair. Your workspace doesn't need to be fancy or elaborate, but it should meet some basic requirements to ensure both safety and quality results. Proper lighting is particularly crucial when working with rust, as inadequate illumination can make it difficult to distinguish between thoroughly cleaned metal and areas that still need attention.
- Location: Sheltered, dry area like a garage, carport, or workshop
- Temperature: Maintain 10-25°C for optimal product performance (use a space heater in winter if needed)
- Ventilation: Ensure adequate airflow – open doors/windows and use fans if necessary
- Lighting: Bright, direct lighting to properly see surface conditions
- Work surface: Stable workbench for smaller parts, properly supported vehicle for larger jobs
- Protection: Cover floor and nearby items to protect from dust, overspray, and chemical spills
- Cleaning station: Access to water and cleaning supplies for tools and hands
Essential Safety Equipment
The importance of proper safety equipment cannot be overstated when undertaking rust repair work. Different phases of the repair process present different hazards, from airborne particles during grinding to chemical exposure during treatment application. Investing in quality safety gear is a worthwhile expense that protects your health and allows you to work with confidence, knowing you're properly protected from potential hazards.
- Respiratory protection: Dust mask for light sanding, proper respirator with appropriate filters for chemical work and heavy grinding
- Eye protection: Safety glasses for basic work, full face shield when using power tools
- Hearing protection: Earplugs or earmuffs when using noisy equipment
- Hand protection: Chemical-resistant gloves for working with treatments, heavy-duty gloves for mechanical work
- Skin protection: Long sleeves, long trousers, and coveralls to protect from dust and splashes
- Foot protection: Closed-toe shoes, preferably with steel toes for heavy parts
- First aid kit: Readily accessible for immediate treatment of any injuries
Safety Warning
When using chemical rust treatments, always read the manufacturer's safety instructions carefully. Many products contain acids or other caustic substances that can cause serious burns. In case of skin contact, follow the specific first aid recommendations provided by the manufacturer. Generally, this involves washing the affected area thoroughly with clean water and seeking medical attention if irritation persists.
The POR-15 System: A Comprehensive Approach
One of the most respected and effective rust treatment systems available in the UK is the POR-15 three-step process. This system has gained popularity among both amateur enthusiasts and professional restorers for its exceptional durability and effectiveness in halting rust progression. The name stands for "Paint Over Rust," reflecting its unique ability to encapsulate and isolate existing rust, preventing further corrosion. While there are many rust treatment products on the market, the systematic approach of POR-15 provides particularly reliable results in the UK's challenging climate.
Understanding the Three-Step System
The POR-15 system consists of three specially formulated products designed to work together for maximum effectiveness. Rather than just covering up rust temporarily, this comprehensive approach addresses the underlying conditions that cause rust while providing a durable protective barrier. Each step in the process performs a specific function to ensure long-lasting results, making it especially valuable for treating areas prone to repeated rust issues.
- Step 1: Marine Clean Degreaser - Removes oils, grease, and contaminants that prevent proper adhesion. This water-based cleaner is more effective than standard degreasers at removing embedded contaminants from porous surfaces.
- Step 2: Metal Ready - A phosphoric acid-based solution that etches the metal surface, removes light rust, and creates a zinc phosphate coating that enhances adhesion. This step creates the ideal surface for the POR-15 coating.
- Step 3: POR-15 Rust Preventive Coating - A moisture-cured polyurethane coating that hardens and becomes stronger when exposed to moisture. Once cured, it forms an extremely hard, non-porous barrier that prevents moisture from reaching the metal surface.
Application Process
Applying the POR-15 system correctly requires attention to detail and following the manufacturer's instructions precisely. Unlike conventional paints, POR-15 has specific application requirements that must be observed to achieve optimal results. The coating reacts with moisture in the air to cure, which gives it unique properties but also requires careful handling during application. Taking the time to execute each step properly will reward you with a finish that can last for years, even in challenging conditions.
- Surface preparation: Remove loose rust and scale with wire brushes or abrasives. The goal is to remove loose material, not necessarily all rust.
- Apply Marine Clean: Dilute as directed and apply to the surface. Scrub with a brush, allow to work for 10-15 minutes, then rinse thoroughly with clean water. Allow to dry completely.
- Apply Metal Ready: Apply liberally to the surface and keep wet for 15-30 minutes. The metal will typically change color to a gray or black phosphate coating. Rinse thoroughly with clean water and allow to dry completely.
- Apply POR-15 Coating: Stir thoroughly (do not shake) and apply a thin, even coat using a high-quality brush. Allow to dry for 3-6 hours until tacky but not completely dry.
- Apply second coat: Apply a second thin coat while the first coat is still tacky. This creates the strongest bond between coats.
- Final steps: Allow to cure for 24-48 hours. If exposing to UV light, apply a UV-resistant topcoat like POR-15 Top Coat or automotive paint.
Pro Tip from Frost.co.uk
POR-15 dries extremely hard and is difficult to remove once cured. Wear disposable gloves, protect all areas you don't want coated, and clean tools immediately after use with POR-15 Solvent or lacquer thinner. The product will form a skin in the can once opened, but the product beneath remains usable. To minimize this, transfer what you need to a separate container and keep the original can tightly sealed.

DIY Surface Rust Repair Guide
Surface rust represents the earliest stage of corrosion and is the most straightforward type to address as a DIY project. Catching and treating rust at this early stage can prevent it from developing into more serious damage that requires extensive repairs. Unlike more advanced corrosion, surface rust hasn't significantly compromised the metal's integrity, making it an ideal candidate for DIY treatment with minimal specialized tools or skills required. This step-by-step guide walks you through the process of treating surface rust effectively.
Materials Needed
Before beginning your surface rust repair project, gathering all necessary materials will make the process more efficient and help ensure you don't need to interrupt your work to source additional supplies. Most of these items are readily available from automotive suppliers like Frost.co.uk or general hardware stores throughout the UK. Quality matters when selecting your materials, particularly with abrasives and rust treatments, as premium products typically yield better results and make the work easier.
- Cleaning supplies: Automotive degreaser, microfiber cloths, isopropyl alcohol
- Abrasives: 80, 120, 220, and 400 grit sandpaper, sanding blocks, steel wool
- Wire brushes: Both hand brushes and a drill attachment for larger areas
- Masking materials: Masking tape, plastic sheeting or newspaper
- Rust treatment: Rust converter (like Kurust or Dinitrol RC800)
- Primer: Self-etching or zinc-rich automotive primer
- Paint: Color-matched automotive paint
- Clear coat: Automotive clear coat (if using a two-stage paint system)
- Application tools: Quality brushes or spray equipment, mixing cups, stirrers
Step-by-Step Process
- Clean the affected area
Begin by thoroughly cleaning the rusty area and surrounding surfaces with automotive degreaser to remove any dirt, oils, or road grime. These contaminants can interfere with treatment and prevent proper adhesion of coatings. Pay particular attention to crevices and seams where contaminants often accumulate. Rinse well with clean water and allow to dry completely before proceeding.
- Remove loose paint and rust
Using a wire brush or 80-grit sandpaper, remove all loose and flaking paint around the rusted area. Continue with progressively finer grits of sandpaper (120, then 220) to remove the surface rust down to bare metal where possible. The goal is to remove all active rust while creating a clean transition zone between the treatment area and surrounding paint. For difficult-to-reach areas, a wire brush drill attachment can be very effective.
- Feather the edges
Using 220 and then 400 grit sandpaper, feather (taper) the edges of the existing paint around the repair area to create a smooth transition. This step is crucial for achieving an invisible repair, as it prevents a noticeable edge or "step" between the original paint and your repair. Take your time with this step, as rushing it will be evident in the final result.
- Clean and degrease again
After sanding, wipe the area with isopropyl alcohol or panel prep solvent to remove all dust and any remaining contaminants. This final cleaning step is essential for proper adhesion of the treatments and coatings that follow. Use a lint-free cloth and ensure the surface is completely clean and dry before proceeding.
- Apply rust converter
If any stubborn rust remains that couldn't be completely removed by sanding, apply a quality rust converter following the manufacturer's instructions. Products like Dinitrol RC800 or Kurust will convert iron oxide (rust) into a stable compound that prevents further corrosion. Allow the converter to fully react and dry according to the product instructions before moving to the next step.
- Apply primer
Apply a self-etching or zinc-rich primer to the bare metal and treated areas. This critical layer provides corrosion protection and creates a surface to which paint can properly adhere. Apply in thin, even coats, allowing each coat to flash off (partially dry) before applying the next. Extend the primer slightly beyond the bare metal area onto the feathered paint edges to ensure complete coverage.
- Apply color coat
Once the primer has dried according to the manufacturer's recommendations, apply your color-matched paint. For best results, use thin, even coats, allowing appropriate drying time between applications. Typically, two to three coats will provide adequate coverage without risking runs or sags. If you're using spray cans, keep the can about 20-25cm from the surface and use steady, overlapping passes.
- Apply clear coat (if using two-stage paint)
If you're using a modern two-stage paint system, apply the clear coat once the color coat has dried but is still within the recoat window (typically 1-24 hours). The clear coat provides UV protection and delivers the final gloss and depth to the finish. Apply 2-3 medium coats, allowing proper flash time between coats as specified by the manufacturer.
- Allow proper curing
Though the paint may feel dry to the touch within hours, allow the repair to fully cure for at least 48-72 hours before washing, waxing, or exposing to harsh conditions. During this curing period, the coating continues to harden and develop its maximum durability and adhesion properties. In the UK's often cool and damp climate, longer curing times may be necessary, particularly in winter months.
DIY Tip for Surface Rust
For small areas of surface rust, particularly on components like brackets or bolts, naval jelly (phosphoric acid gel) can be an effective treatment. Apply to the rusty area, allow it to work for 5-10 minutes until the rust changes color, then rinse thoroughly and dry. Once clean, immediately apply a protective coating to prevent new rust formation. This method is particularly useful for intricate parts that are difficult to sand effectively.
DIY Scale Rust Repair Guide
Scale rust presents a more significant challenge than surface rust, as the corrosion has begun to affect deeper layers of the metal. However, with the right approach and tools, many scale rust issues can still be successfully addressed by DIY enthusiasts. Scale rust typically appears as flaking or bubbling metal, with visible layering of the corroded material, but hasn't yet progressed to complete perforation. Addressing scale rust promptly can save a panel that might otherwise require replacement if the corrosion continues to advance.
Tools and Materials
Scale rust repair requires more specialized tools than surface rust treatment due to the increased severity of the corrosion. Since you'll be dealing with more aggressive removal methods and potentially filling and reinforcing weakened metal, having the right equipment is essential for achieving satisfactory results. Consider purchasing rather than renting power tools if you plan to tackle multiple rust repair projects, as having them available for future touch-ups can be valuable in the UK's rust-prone climate.
- Power tools: Angle grinder with wire cup brush attachment, flap discs, and cutting discs
- Hand tools: Wire brushes, scraping tools, body hammer and dolly for reshaping
- Abrasives: Various grits of sandpaper from coarse (40 grit) to fine (400 grit)
- Rust treatment: Rust converter (such as Bilt Hamber Hydrate 80 or POR-15 Metal Prep)
- Reinforcement materials: Fiberglass mesh, metal patch panels if needed
- Body fillers: Reinforced body filler (like U-POL Fibral), standard body filler, glazing putty
- Primers and sealers: Epoxy primer, high-build primer, sealer
- Paint system: Basecoat/clearcoat or single-stage paint matching your vehicle
- Application equipment: Quality brushes, rollers, or spray equipment
Step-by-Step Repair Process
- Assess the damage
Begin by thoroughly cleaning the area to reveal the full extent of the rust damage. Carefully examine the affected area to determine the boundaries of the corrosion and assess the thickness of the remaining metal. Use a small hammer to gently tap around the visible rust—a dull sound indicates potential hidden rust or weakened metal beneath what appears to be solid. This assessment phase is crucial for developing your repair strategy and determining whether DIY repair is appropriate or if professional help should be sought.
- Remove rust aggressively
Using an angle grinder fitted with a wire cup brush, carefully remove all scale rust down to solid metal. Work methodically across the entire affected area, paying particular attention to edges and seams where rust often penetrates deeper. For severely scaled areas, you may need to start with a coarse flap disc to remove the worst of the corrosion before switching to a wire brush for final cleaning. Keep the tool moving to avoid gouging the metal, and work at an angle that directs debris away from you.
- Evaluate metal condition
After removing all visible rust, assess the condition of the remaining metal. If the metal is significantly thinned but not perforated, it can typically be reinforced. If holes have developed, you'll need to decide between patching with reinforced filler (for very small holes in non-structural areas) or metal patch panels (for larger holes or structural areas). This evaluation determines your next steps and the materials you'll need for proper repair.
- Treat remaining rust
Apply a quality rust converter to any areas where traces of rust remain, particularly in pitted areas or hard-to-reach spots. Products like Bilt Hamber Hydrate 80 or Dinitrol RC800 chemically convert iron oxide into a stable compound that resists further corrosion. Allow the converter to fully react according to the manufacturer's instructions, which typically takes several hours. This step helps ensure that no active rust remains to spread beneath your repair.
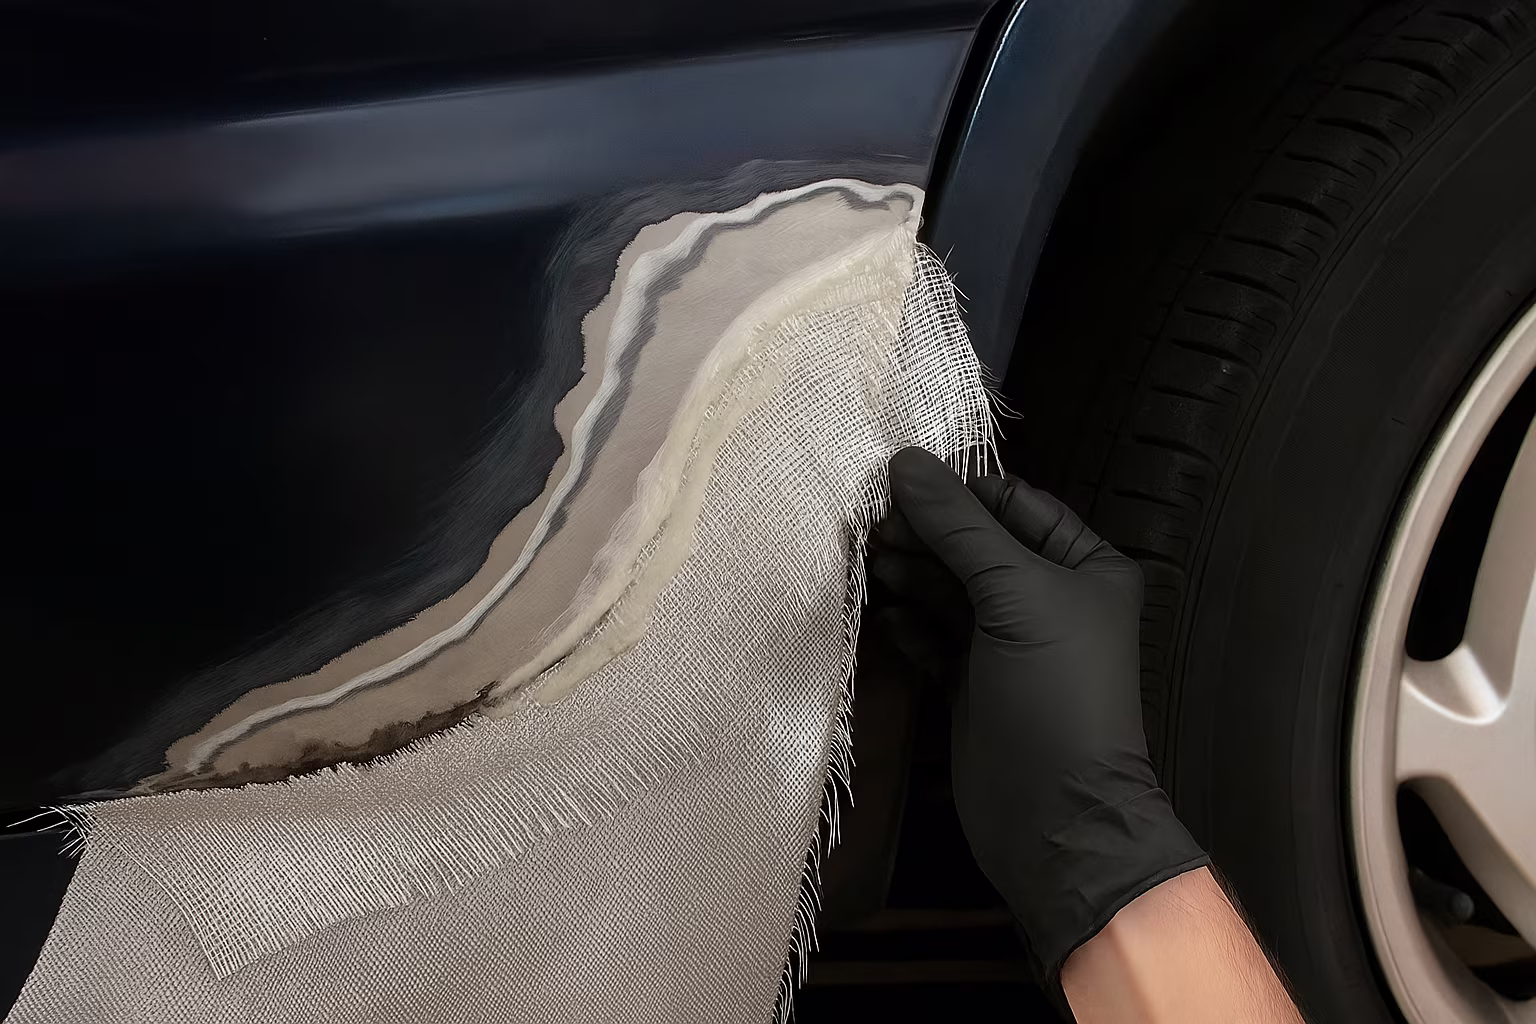
- Apply reinforcement (if needed)
For significantly thinned areas, reinforcement is necessary to restore structural integrity. Cut fiberglass mesh to extend beyond the damaged area by at least 2-3cm in all directions. For small holes (up to about 5mm), reinforced body filler can bridge the gap when backed by mesh. Apply a thin layer of reinforced body filler (like U-POL Fibral), embed the fiberglass mesh, then cover with additional filler. Build up in thin layers rather than one thick application to prevent shrinkage and cracking.
- Shape and smooth the filler
Once the reinforced filler has cured according to the manufacturer's instructions, shape it to match the original panel contour using progressively finer grits of sandpaper. Start with 80-grit to establish the basic shape, then move to 120-grit and 220-grit to refine the surface. For any minor imperfections, apply a thin layer of glazing putty and sand smooth with 320-grit sandpaper once dry. The goal is to recreate the original panel shape with no visible transitions or irregularities.
- Apply epoxy primer
Once the surface preparation is complete, apply a high-quality epoxy primer to seal the repair and provide a foundation for the paint system. Epoxy primers offer excellent adhesion and moisture resistance, making them ideal for previously rusted areas. Apply according to the manufacturer's instructions, typically 2-3 coats with appropriate flash time between applications. Allow the primer to cure fully before proceeding to the next step.
- Apply high-build primer and block sand
Apply high-build primer-surfacer over the epoxy primer to fill minor imperfections and create a perfectly smooth surface for painting. Once dry, block sand with 320-grit sandpaper, followed by 400-grit for a final finish. Use a sanding block or flexible sanding pad to maintain flat surfaces and proper contours. If any low spots are discovered during sanding, apply additional primer and repeat the process until the surface is perfect.
- Paint and finish
Apply a sealer coat if recommended by your paint system, then proceed with your basecoat/clearcoat or single-stage paint application. Follow the paint manufacturer's instructions regarding application technique, flash times, and curing requirements. For the best color match, blend the new paint into the surrounding area rather than stopping at a hard edge. Once the paint has fully cured (typically 24-48 hours minimum), carefully polish the edges of the repair to blend it seamlessly with the surrounding paint.
Repairing Small Rust Holes
When rust has progressed to create holes in your vehicle's body panels, the repair becomes more challenging but remains within reach of skilled DIY enthusiasts. Small rust holes (typically up to 1-2cm in diameter) in non-structural panels can often be repaired without welding, using modern repair materials and techniques. This approach is particularly useful for holes in cosmetic areas where structural strength is less critical, such as door skins, wings/fenders, and boot/trunk lids.
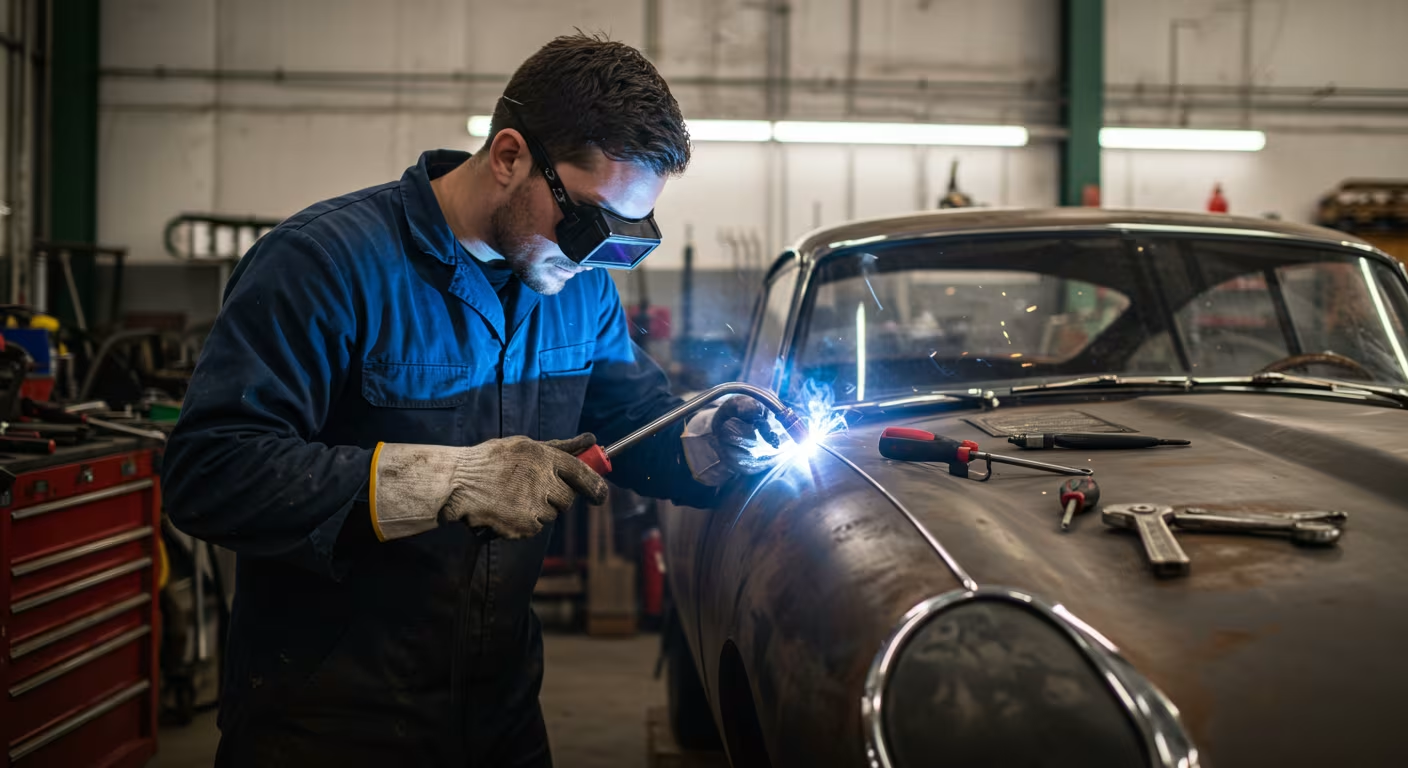
It's important to note that for structural components or larger holes, proper metal repair with welding is the only appropriate solution. The techniques described below are for non-structural, cosmetic repairs only. When in doubt about the structural importance of the affected area, consult with a professional body shop. If you are considering investing in welding equipment to tackle these larger repairs yourself, see our guide on Best MIG Welders for Car Restoration.
Materials Needed
Repairing small rust holes requires specific materials designed to bridge gaps while providing sufficient strength and durability. The development of advanced repair compounds has made DIY hole repair more accessible than ever before, with products specifically engineered to bond to automotive metals and resist future corrosion. Having all materials ready before beginning ensures a smooth workflow and allows you to complete each step within the working time of the various compounds.
- Backing material: Aluminum mesh, fiberglass cloth, or backing plates
- Adhesives: Epoxy adhesive or panel bonding adhesive
- Reinforced fillers: Fiberglass-reinforced body filler
- Standard body filler: For final shaping and contouring
- Rust treatment: Rust converter for treating the edges of the hole
- Primers: Epoxy primer, high-build primer
- Paint system: Matching color and clear coat
- Tools: Angle grinder, sanding tools, applicators, mixing board
Repair Procedure
- Prepare the repair area
Begin by removing all rust surrounding the hole using an angle grinder with a wire wheel or flap disc. It's essential to remove all traces of active corrosion and expand the cleaned area at least 2-3cm beyond the visible hole in all directions. Without thorough rust removal, corrosion will continue to spread beneath your repair, causing it to fail prematurely. Sand the edges of the hole to remove any sharp edges and create a slight bevel that will help the filler adhere.
- Treat the edges
Apply rust converter to the entire cleaned area, paying particular attention to the edges of the hole where traces of rust might remain. This step helps ensure that any microscopic rust not visible to the naked eye is neutralized before you seal the area. Allow the converter to fully react and dry according to the manufacturer's instructions before proceeding.
- Create a backing
For holes up to about 1cm in diameter, you can often bridge the gap directly with reinforced filler. For larger holes, create a backing to support the filler by either:
- Cutting aluminum mesh slightly larger than the hole and securing it behind the opening with epoxy adhesive
- Using a flexible backing plate inserted through the hole, then pulled flat against the backside and secured with adhesive
- For accessible areas, bonding fiberglass cloth to the back of the hole with resin
Allow the adhesive or resin to cure fully before proceeding to ensure the backing is securely anchored.
- Apply reinforced filler
Mix fiberglass-reinforced body filler according to the manufacturer's instructions. Apply the filler over the hole and backing, extending it beyond the damaged area to create a strong bond with the surrounding metal. Build up slightly higher than the surrounding surface to allow for sanding. Work quickly but carefully, as most reinforced fillers have a relatively short working time. If filling a larger hole, consider applying in layers rather than one thick application to minimize the risk of cracking or shrinkage.
- Shape the repair
Once the reinforced filler has cured completely (usually 30 minutes to an hour, depending on temperature and product), begin shaping it with 80-grit sandpaper to establish the basic contour. As you approach the final shape, switch to finer grits (120, then 180) for more precise control. Remember that the goal is to match the original panel contour exactly, which may include subtle curves or character lines.
- Apply finishing filler
For a smoother finish, apply a thin layer of standard body filler over the reinforced filler. This provides a finer grain material that's easier to sand to a perfect finish. Once cured, sand with progressively finer grits (180, 240, 320) until the repair is indistinguishable from the surrounding panel when viewed from different angles and lighting conditions. Take your time with this step, as the quality of your surface preparation directly affects the final appearance.
- Prime and finish
Apply epoxy primer to seal the repair and provide corrosion protection, followed by high-build primer to fill any minor imperfections. Block sand the primed surface with 400-grit sandpaper for a perfectly smooth finish. Apply color coat and clear coat according to the paint manufacturer's instructions, extending beyond the repair area to blend seamlessly with the existing finish. After proper curing, carefully polish the entire area to match the surrounding panel's gloss and texture.
Important Limitation
This method is suitable only for non-structural, cosmetic repairs. For holes in structural components like chassis rails, sills, suspension mounting points, or other load-bearing areas, proper metal repair with welding is essential for safety. If you're unsure whether an area is structural, consult a professional body shop before attempting repairs.
Rust Product Comparison: Choosing the Right Solution
The UK market offers a wide range of rust treatment products, each designed for specific applications and scenarios. Understanding the differences between these products is essential for selecting the right solution for your particular rust issue. Rust converters, rust encapsulators, direct-to-rust paints, and rust neutralizers all have their place in the DIY arsenal, but they function differently and deliver varying results depending on the situation.
Rust Converters vs. Rust Encapsulators
One of the most common points of confusion for DIY enthusiasts is understanding the difference between rust converters and rust encapsulators. While they may seem similar, these products work in fundamentally different ways and are designed for different stages of the rust repair process. Using the right product for your specific situation can make the difference between a lasting repair and one that fails prematurely.
Rust Converters chemically transform iron oxide (rust) into a stable compound, typically iron phosphate or iron tannate. This conversion process changes the rust from its reactive, expansive state into an inert material that resists further corrosion. The key characteristics of rust converters include:
- Actively change the chemical composition of rust
- Typically turn rust black or dark purple when reaction is complete
- Work best on light to moderate rust
- Usually require a topcoat for long-term protection
- Examples: Kurust, Dinitrol RC800, Bilt Hamber Hydrate 80
Rust Encapsulators, on the other hand, don't change the chemical nature of rust. Instead, they seal and isolate existing rust from oxygen and moisture, preventing further corrosion. These products create a barrier that locks in the rust and provides a paintable surface. Their key characteristics include:
- Seal rust without chemically changing it
- Create a tough, resilient barrier
- Can be applied over heavier rust
- Many can serve as a primer or topcoat
- Examples: POR-15 Rust Preventive Coating, Rustbuster Epoxy Mastic, Eastwood Rust Encapsulator
Product Selection Guide
With the vast array of rust treatment products available, selecting the right one for your specific situation can be challenging. The following guide, based on recommendations from Frost.co.uk technical articles, helps match common rust scenarios with the most appropriate treatment solutions. Each product category has specific applications where it performs best, and understanding these distinctions will help you achieve optimal results.
| Rust Scenario | Recommended Product Type | UK Examples | Application Notes | Expected Durability |
|---|---|---|---|---|
| Light surface rust | Rust Converter | Kurust, Dinitrol RC800 | Convert rust, then prime and paint | 3-5 years with proper topcoats |
| Heavy surface rust | Rust Converter followed by Encapsulator | Bilt Hamber Hydrate 80 + POR-15 | Convert first, then seal for maximum protection | 5-10 years |
| Rust in hard-to-reach areas | Penetrating Rust Converter | Dinitrol RC900, Fe-123 | Low viscosity formulas that creep into seams | 2-4 years |
| Frame rails, chassis components | Heavy-duty Encapsulator | POR-15, Rustbuster Epoxy Mastic | Requires thorough cleaning and preparation | 10+ years |
| Cosmetic rust on visible areas | Direct-to-Rust Paint | Hammerite Direct to Rust, Rustoleum CombiColor | Convenient all-in-one solution | 2-3 years |
| Preventative treatment | Cavity Wax or Rust Inhibitor | Dinitrol ML, Bilt Hamber Dynax S50 | Apply to clean, dry surfaces | 2-5 years depending on exposure |
Frost.co.uk Product Insight
According to Frost.co.uk technical articles, the POR-15 system consistently delivers superior long-term results when used according to their three-step process. While more labor-intensive than single-product solutions, independent testing has shown that proper application of the complete system can provide 10+ years of protection even in severe environments. The key to its effectiveness is following all three steps in sequence - Marine Clean, Metal Ready, and the POR-15 Coating - rather than just applying the final coating alone.
Conclusion: Developing Your DIY Rust Repair Skills
DIY rust repair is both a practical skill and an ongoing learning process. As you tackle various rust issues on your vehicle, you'll develop techniques and insights that make each subsequent repair more efficient and effective. The satisfaction of successfully addressing rust problems yourself, combined with the significant cost savings compared to professional body shop rates, makes this a rewarding area of automotive maintenance to master.
Remember that rust repair is fundamentally about thoroughness and patience. Rushing through preparation or application typically leads to premature failure of the repair. In the UK's challenging climate, where vehicles face constant exposure to moisture and often road salt, proper rust repair techniques are particularly valuable skills for any vehicle owner.
Key Takeaways
- Address rust as early as possible - surface rust is far easier to treat than advanced corrosion
- Invest in quality materials and tools - they typically deliver better results and are more cost-effective in the long run
- Follow systematic approaches like the POR-15 three-step system for the most durable results
- Know the limitations of DIY repair - structural rust should be addressed by professionals
- Combine treatment with prevention - after repair, implement protective measures to prevent recurrence
- Learn from each project - document your process and results to refine your technique over time
By applying the techniques and product recommendations in this guide, you'll be well-equipped to tackle most common rust issues on your vehicle. For more specific guidance on preventing rust in the first place, visit our Rust Prevention Guide, or explore our detailed information on identifying different types of rust to catch problems at their earliest stages.
References and Further Reading
- Frost.co.uk, "How do I stop rust permanently with POR-15 Solutions?", 2023
- Frost.co.uk, "Rust Converter Vs. Rust Encapsulator", Technical Article, 2022
- Society of Automotive Engineers, "Effectiveness of DIY Rust Repair Methods", Technical Paper 2024-01-0621
- British Coatings Federation, "Automotive Refinishing Best Practices for DIY Enthusiasts", 2024 Edition
- Institute of Corrosion, "Comparative Analysis of Rust Treatment Products for Automotive Applications", Research Paper 2023-05